For both TrueNAS users and FreeBSD enthusiasts, setting up audiobookshelf can be a worthy endeavor to manage and enjoy your audiobook collection. While this guide is primarily tailored for TrueNAS users, it should also be applicable to FreeBSD users. Keep in mind that software dependencies and instructions may evolve over time, so it's essential to refer to the project's documentation and dockerfile for the latest information. At the time writing, I did this on TrueNAS Core 13.
Installation:
Before starting, it's important to note that as of the time of writing, the "tone" application is not yet ported to FreeBSD, and therefore, some metadata capabilities may be missing, though it's only needed for writing to the files themselves.
1. Setup the jail:
First we need to setup the jail to actually contain our app. Only use one of the following commands. I would recommend assigning the IP yourself. Remember to note down the IP you assign it or it gets assigned:
language: sh
1# assign an ip yourself2sudo iocage create -n "audiobookshelf" -r 13.2-RELEASE ip4_addr="vnet0|<IPADDR>/24" defaultrouter="<ROUTER>" vnet="on" boot="on"34# or have your router assign one5sudo iocage create -n "audiobookshelf" -r 13.2-RELEASE dhcp="on" vnet="on" boot="on"
2. Mount your audiobooks and eBooks:
You can do this two ways. Stop the jail and mount the directories via the TrueNAS jail GUI. Or you if you don't want to have to stop the jail you can mount them via the command line. Here's an example:
language: sh
1$ sudo iocage exec audiobookshelf mkdir -p /media/audiobooks2$ sudo iocage exec audiobookshelf mkdir -p /media/ebooks34$ sudo iocage fstab -a audiobookshelf /mnt/<NAME_OF_POOL>/<...>/audiobooks /media/audiobooks nullfs rw 0 05$ sudo iocage fstab -a audiobookshelf /mnt/<NAME_OF_POOL>/<...>/ebooks /media/ebooks nullfs rw 0 0
3. (OPTIONAL) Create Directories for Configuration:
Set up directories outside the jail for safekeeping in case of migration or deletion of the jail. Be sure to create backups of the folders inside the jail just in case you make a mistake on this step:
language: sh
1# default paths used in the script2$ sudo iocage exec audiobookshelf mkdir -p /root/audiobookshelf/config3$ sudo iocage exec audiobookshelf mkdir -p /root/audiobookshelf/metadata4$ sudo iocage exec audiobookshelf mkdir -p /root/audiobookshelf/backup56$ mkdir -p /mnt/<NAME_OF_POOL>/apps/audiobookshelf/config7$ mkdir -p /mnt/<NAME_OF_POOL>/apps/audiobookshelf/metadata8$ mkdir -p /mnt/<NAME_OF_POOL>/apps/audiobookshelf/backup910$ sudo iocage fstab -a audiobookshelf /mnt/<NAME_OF_POOL>/apps/audiobookshelf/config /root/audiobookshelf/config nullfs rw 0 011$ sudo iocage fstab -a audiobookshelf /mnt/<NAME_OF_POOL>/apps/audiobookshelf/metadata /root/audiobookshelf/metadata nullfs rw 0 012$ sudo iocage fstab -a audiobookshelf /mnt/<NAME_OF_POOL>/apps/audiobookshelf/backup /root/audiobookshelf/backup nullfs rw 0 0
4. Install/Update Script
The following script will download and update audiobookshelf in the case of updates. I use this script myself, though I am a noob in sh scripting. Feel free to explore the source code, I'm open to comments and suggestions for potential improvements. For those interested you can change the install directories and various other paths. Here's the basics if you want to get it done quick and easy:
language: sh
1$ sudo iocage console audiobookshelf23# should always link to the latest revision of script4$ fetch https://gist.githubusercontent.com/lbrooney/a39d1a8a62251a69df09f3af4ff9b373/raw/update_audiobookshelf.sh56$ chmod +x update_audiobookshelf.sh78$ ./update_audiobookshelf.sh
The first time you run it in a new jail, it will likely prompt you to bootstrap pkg, you can just enter y for that.
5. First Time Setup
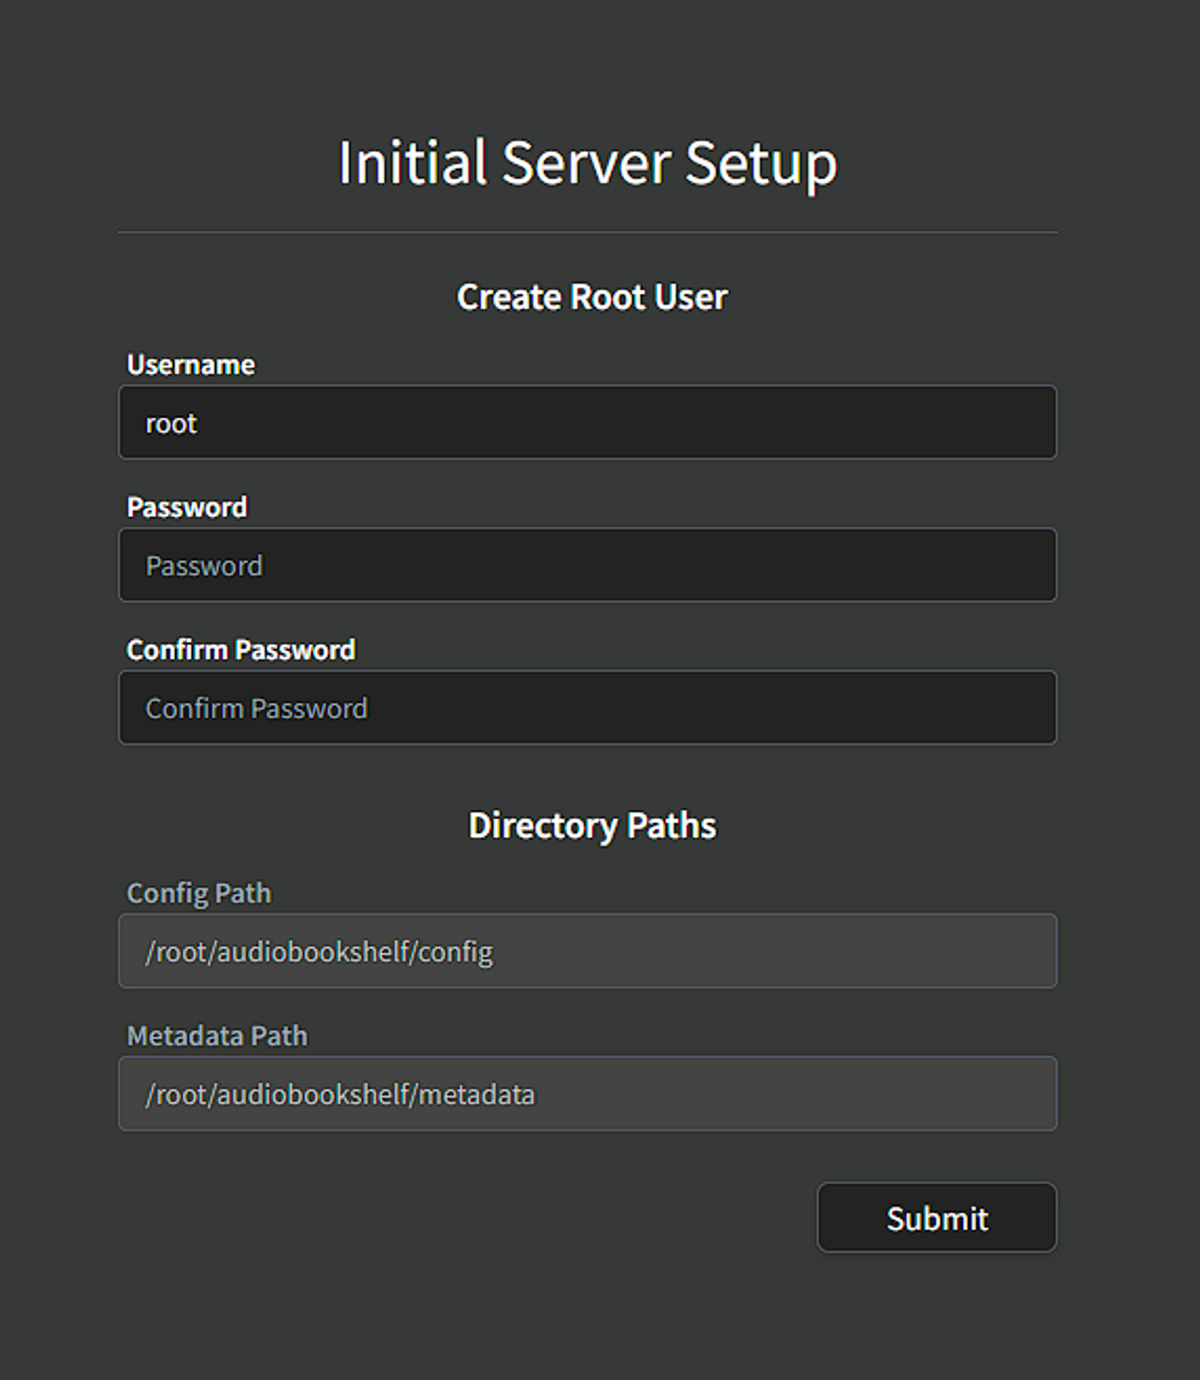 The Initial Server Setup
Navigate to your browser and access the assigned IP address. If you encounter a "This site can't be reached" error, it's possible that your browser has automatically redirected you to HTTPS. In such a scenario, explicitly request HTTP to establish a connection.
You can't change Directory Paths in the GUI, travel to `pm2config.json` in the install directory, and be sure to change the values in the script as well for future updates.
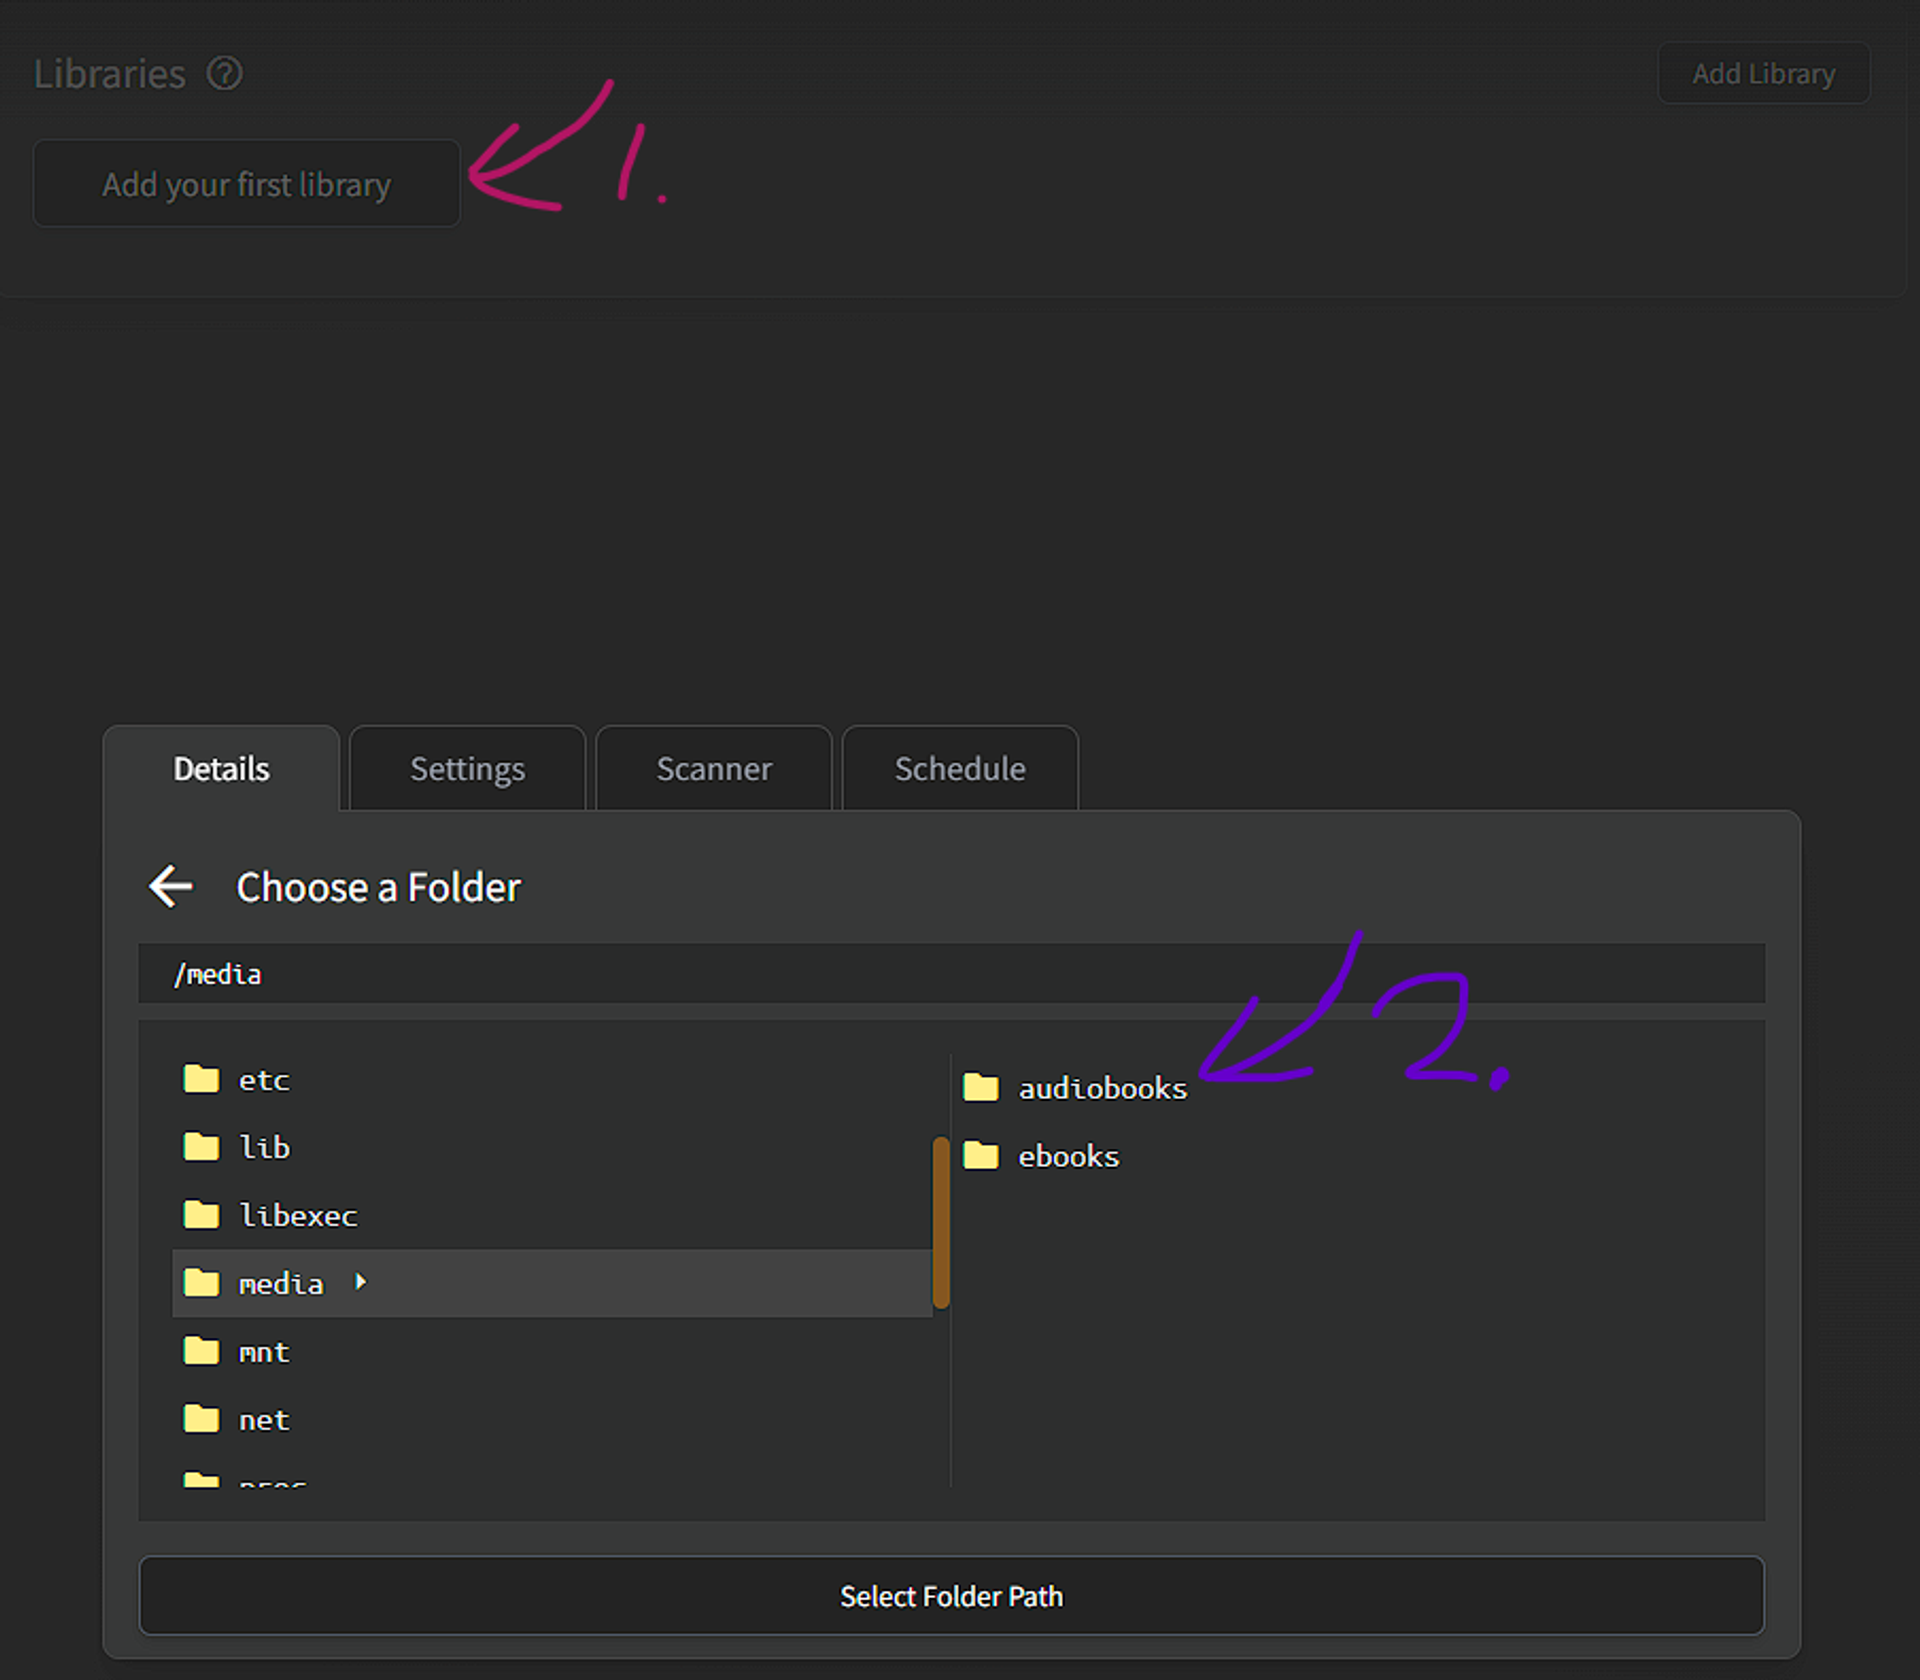 Setting up your first library
Travel to where ever you mounted your audiobooks. Add to library and you're done with the basics.
6. Reverse proxy
You can find the specific settings for whatever your preferred reverse proxy software here. If you're completely clueless, Caddy is simple and does the job easy. For example, somebody made a semi-automatic script for installing Caddy for TrueNAS Core 13.
Conclusion
In closing, here's to a seamless Audiobookshelf setup for both TrueNAS rookies and FreeBSD pros. Happy listening! 🎧